


Captioneer v1.0
Captioneer is a tool for creating popup-style closed captions on 29.97fps NTSC video as defined by the CEA-608-B standard. Mostly its purpose is to allow you to easily add closed captions and subtitles to amateur video productions on DVD. Captioneer lets you directly edit each popup caption, then convert your captions into a subtitle file that you can import into other applications, such as DVD-Lab Pro.
Captioneer supports the following features of the closed caption system:
- Standard popup captions (white text on a black background)
- Full character set, including correct handling of all standard, special and extended characters
- Italic and underlined text
- Saves caption data in .ccd, .scc or .bin format, or inserts it directly into an MPEG-2 elemental video stream.
- Exports to .srt subtitle file format
Flashing and colored text are not yet supported. I do not plan to implement paint-on or roll-on captions, ATSC (CEA-708-B) captions or captions for 24fps video.
System Requirements
- Windows 2000, 2003, XP or Vista
- DirectX 8 or higher
- 800x600 minimum screen resolution
Download and Installation Instructions
Click here to download Captioneer.
- Open the zip file and run CaptioneerSetup.msi
- Download and install the Microsoft Visual C++ 2008 Redistributable Package (x86).
Tech notes
In commercial DVD's and TV broadcasts, every double-byte control code is normally repeated in the next frame, in order to compensate for weak signals. While working on this program, I found that repeating the codes caused most TV's to interpret the codes twice, corrupting the caption display.
Because of this, Captioneer does not repeat control codes. Given that the signal from the DVD player should be clean and strong, repetition of codes is unnecessary, and every television I've tested the captions with interprets them correctly.
If a code should in fact be interpreted twice (for instance, two consecutive note characters), Captioneer automatically inserts a pair of NULL characters between the codes to avoid confusion. Unfortunately, this does not work properly on some televisions.
Using Captioneer
Adding captions to a DVD is a process that takes time and patience. Here are the steps that I go through to add captions and subtitles to my DVD's:
- Create a preview version of the video and select it into your new caption project
- Create each caption at the desired frame and screen position
- Set the timing options for each caption
- Save the captions to a file or multiplex them into the final MPEG-2 video stream
- Export the captions to a subtitle file
- Edit the subtitle file in a text editor to correct capitalization and spacing
- Import the MPEG-2 video and subtitle file into a DVD authoring program
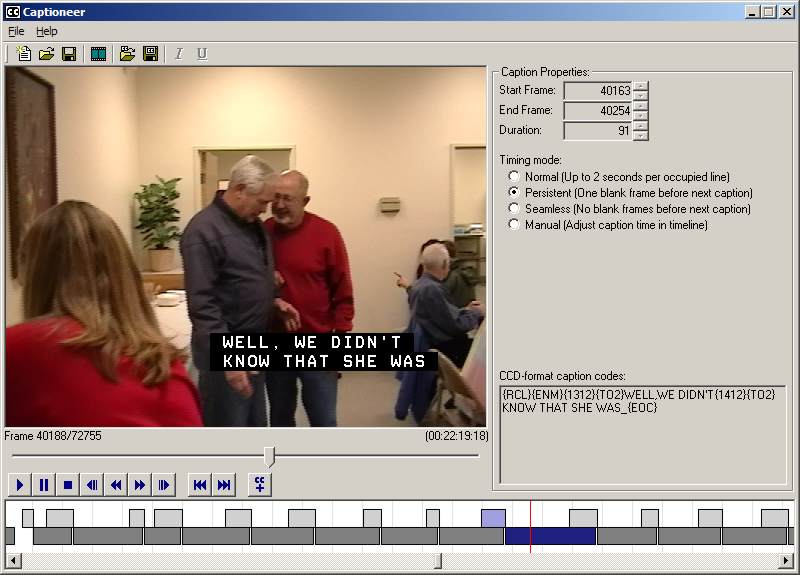
The Captioneer GUI
All caption editing functions are in easy reach, arranged in one window.
- The preview pane is the largest part of the Captioneer window. In it, you can watch the movie and edit the captions right on the frame.
- Beneath the preview pane, the navigation controls move you back and forth within the video.
- The properties pane is to the right of the preview pane. Using the properties pane, you can change the timing settings of the currently displayed caption.
- The timeline stretches along the bottom of the window. You can use the timeline to pick a specific frame or change the timing of the captions.
Creating the preview video
To add captions to a movie using Captioneer, begin by selecting a preview video stream to work with. Adding captions should be one of the later stages of post-production, after all the video editing is finished, and you have the final cut. The media file you select should also contain an audio stream, so you can hear the dialogue as you edit the captions.
I recommend using an MPEG-1 or AVI version of the video for the caption project, since MPEG-2 playback is not frame-accurate in DirectX, and your captions will end up out of sync. In most cases, a 30fps Video CD-quality MPEG-1 file (1150 kbits/sec) is sufficient for the preview.
To select the video stream in Captioneer, click the filmstrip icon in the toolbar, or select "Choose Video Stream" from the File menu.
Locating the desired frame for the first caption
Once you have selected the video stream, find the frame in the video where you wish to place the first caption.
To move back and forth in the video, you can either position the slider, use the navigation buttons below the preview pane, or click and drag in the white area of the timeline. Each of the three methods has different advantages:
- The slider lets you quickly find any scene anywhere in the movie
- The navigation buttons let you hear the audio track
- The timeline lets you accurately pick specific frames.
Creating the caption
With the desired frame displayed, click in the preview pane at the position you want the upper-left corner of the caption, and begin typing. Captioneer automatically creates a new caption and places it at the current frame.
Captions are displayed in a fixed-with font, aligned on a grid 32 characters wide and 15 rows high. You cannot type past the right edge of the grid.
According to the standard, each caption can use up to four lines of the display, but Captioneer does not enforce this requirement. You may use any four of the 15 lines - they do not have to be consecutive.
While you are typing in the preview pane, the following key combinations have special functions:
- Enter: Begin a new line, just below the one you're editing
- Tab: Shift the current line 4 positions to the right
- Ctrl+Tab: Shift the current line 4 positions to the left
- Shift+Tab: Shift the current line 1 position to the right
- Ctrl+Shift+Tab: Shift the current line 1 position to the left
- Ctrl+Up Arrow: Shift the current line and any lines above it up one row
- Ctrl+Down Arrow: Shift the current line and any lines below it down one row
- Ctrl+E: Centers the current line horizontally
- Ctrl+I: Toggle italics
- Ctrl+U: Toggle underline
You can also enter special symbols and international characters using the key combinations given in the character set table below. Many of these characters are part of the extended character set. On televisions that do not support the extended character set, extended characters are replaced by a close approximation from the standard characters. For instance, on some televisions, the Spanish caption ¡NO SÉ! may display as: !NO SE!
| Accented letters | ||
|---|---|---|
| Vowel with acute accent | á é í ó ú Á É Í Ó Ú | Ctrl+' then the letter |
| Vowel with grave accent | à è ì ò ù À È Ì Ò Ù | Ctrl+` then the letter |
| Vowel with circumflex | â ê î ô û Â Ê Î Ô Û | Ctrl+Shift+^ then the letter |
| Vowel with dieresis | ä ë ï ö ü Ä Ë Ï Ö Ü | Ctrl+Shift+: then the letter |
| A, N, or O with tilde | Ã ã Ñ ñ Õ õ | Ctrl+Shift+~ then the letter |
| C with cedilla | Ç ç | Ctrl+, then the letter |
| A with ring | Å å | Ctrl+Shift+@ then the letter |
| O with stroke | Ø ø | Ctrl+/ then the letter |
| Ess-tsett (German sharp S) | ß | Ctrl+Shift+& then s |
| Punctuation | ||
| Inverted question mark | ¿ | Ctrl+Alt+Shift+? |
| Inverted exclamation point | ¡ | Ctrl+Alt+Shift+! |
| Opening single quote | ‘ | Ctrl+` then ' |
| Closing single quote | ’ | Ctrl+' then ' |
| Opening double quote | “ | Ctrl+` then " |
| Closing double quote | ” | Ctrl+' then " |
| Opening angle quote | « | Ctrl+` then < |
| Closing angle quote | » | Ctrl+` then > |
| En dash | – | Ctrl+- then - |
| Symbols | ||
| Copyright | © | Ctrl+Alt+c |
| Registered Trademark | ® | Ctrl+Alt+r |
| Service Mark | SM | Ctrl+Alt+s |
| Trademark symbol | ™ | Ctrl+Alt+t |
| Degree | ° | Ctrl+Shift+@ then space |
| One-half | ½ | Ctrl+/ then 2 |
| Divide symbol | ÷ | Ctrl+Shift+: then - |
| Cent | ¢ | Ctrl+/ then c |
| British Pound | £ | Ctrl+- then L |
| Japanese Yen | ¥ | Ctrl+- then Y |
| Currency symbol | ¤ | Ctrl+Shift+@ then x |
| Broken vertical bar | ¦ | Ctrl+- then | |
| Musical note | ♪ | ` |
| Bullet | • | Ctrl+Alt+. |
| Line-drawing characters | ||
| Upper left corner | ┌ | Ctrl+Numpad 7 |
| Upper right corner | ┐ | Ctrl+Numpad 9 |
| Lower left corner | └ | Ctrl+Numpad 1 |
| Lower right corner | ┘ | Ctrl+Numpad 3 |
| Block | █ | Ctrl+Alt+Shift+| |
Note: Sometimes when you add italic or underline text, an extra space is inserted into the caption. This is not a mistake; in the CEA-608-B specification, the formatting control codes double as visible whitespace characters. If the first character in the line is to be italic and/or underlined,you can avoid the extra whitespace at the beginning of the line by placing the left edge of the line within the first four columns.
Tip: If you make or obtain a transcript before inserting the captions, you can cut down on the number of times you backtrack in the preview, and thereby enter the captions more quickly.
Setting the caption timing mode
When you are finished typing the caption, select a display mode for the caption in the right-hand pane:
- Normal: The caption remains on screen for two seconds per line used
- Persistent: The caption remains on screen until the next caption appears, leaving a one-frame (1/30 second) gap
- Seamless: The caption remains on screen until the next caption appears, leaving no gap
- Manual: The caption remains on screen for a custom duration set in the timeline
If you choose Normal or Persistent for the last caption in the project, it is given a default duration of one second. Once you add a new caption beyond it, its time on screen extends to the start of the new caption.
Fine-tuning the caption timing
Now that you have chosen a display mode, the caption appears in the timeline at the bottom of the window. The timeline is shown at a scale of one video frame per pixel.
Each caption is depicted using two rectangular blocks that touch at one corner. The upper block, colored light gray, represents the encoding time, or the time necessary to transmit the caption to the television before it is displayed. The lower block, colored dark gray, represents the caption's display time.
You can select a caption by clicking anywhere in the rectangular blocks. When you select a caption, the preview pane shows the first frame that the caption is on screen.
You can move a caption in time by clicking and dragging the caption, but you cannot overlap two encoding (upper) blocks. You can change a caption's duration by clicking and dragging the right edge of the display time (lower) block. Changing a caption's duration automatically sets its display mode to Manual.
Exporting the finished captions
When you are finished entering all the captions for the project and are ready to author the DVD, you can either save the closed caption data to a separate file or multiplex the captions into the final MPEG-2 elemental video stream (*.m2v). Do not re-encode the video after adding captions, or the data may be lost.
To save the captions in a separate file, click the "CC" disk icon in the toolbar or select "Export Captions" from the File menu. You can save them in raw binary format (*.bin/*.dat), the Scenarist hexadecimal format (*.scc), or a human-readable disassembly format (*.ccd).
To multiplex the captions into an existing MPEG-2 video stream, select "Multiplex into MPEG2 Stream" from the File menu.
If your DVD authoring software doesn't provide explicit support for closed-captions, try multiplexing the captions into the stream. Odds are that the authoring program correctly copies the captions into the VOB files as part of the video stream, but doesn't announce their presence in the IFO files. Most consumer DVD players will still output the closed caption information in the NTSC signal, regardless of the value of the flag in the IFO files.
If you have problems displaying the captions, you can use IFOEdit to change the VTS header (in VTS_*.IFO) to specify that closed captioning data is included for field 1 in the video stream.
Converting captions to subtitles
When your project is done, you can easily create a subtitle stream for DVD-authoring from the closed caption data. Note, however, that the subtitle export process converts all captions to lowercase, since captioned dialog is commonly written in all caps.
To export to a subtitle file, choose "Convert to Subtitle" from the File menu. You can load the resulting file (*.srt) into an authoring program such as DVD-Lab. You may find it easier to edit the captions in a text editor first, to correct the capitalization, line breaks and whitespace usage, and to add special characters such as ellipses or opening and closing quotes.
Frequently Asked Questions
Q: How do I run the program? Whenever I try to start it, Windows says the program's "configuration is
incorrect."
A: In order to run the program, you must download and install the
Microsoft Visual C++ 2008 Redistributable Package (x86).